
Kiyoh & Klantenvertellen Prestashop
Configuring your Kiyoh & Klantenvertellen Prestashop module
1. Get your location id
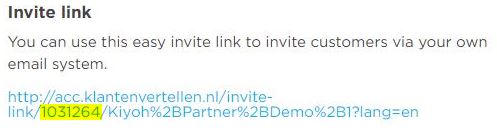
Log into your Kiyoh account and navigate to: invite -> extra options -> invite link.
2. Get your api/hash

You can find this on the same page as the previous step.
3. Prestashop admin

Navigate to your module in the Prestashop admin: modules -> installed modules -> configure.
4. Server

Choose "new kiyoh" or "new klantenvertellen" based on your account. The "old" versions are being phased out.
5. Hash

Enter here the earlier retrieved API key/hash from your account.
6. Location id

Enter here the earlier retrieved location id (yellow marked part of the invite link) from your account.
7. Delay

How long should kiyoh or klantenvertellen wait (in days) after your chosen order status trigger (upcoming step), before sending the review invite?
8. Rating

Add the rating to your front-end. This requires the default placement hook "DisplayNav".
9. Order status

Which order status change should trigger the scheduling of the review invite? Make sure your orders actually hit this status.
10. Language

The two letter code of the language the review invites should be in. For example: nl or en. You can only use one locale per plugin installation.